Building Your Mobile App: Adalo's Complete Development and Deployment Guide
Head to adalo.com, log in, and click to create a new project. Adalo is a no-code app builder for database-driven web apps and native iOS and Android apps—one version across all three platforms, published to the Apple App Store and Google Play.
Key Features:
- AI-Assisted Setup: Describe your app idea, and Adalo generates the database, screens, and logic.
- Cross-Platform Publishing: Publish to Apple App Store, Google Play, and as a Progressive Web App.
- Unlimited Database Records: Paid plans start at $36/month with no limits on storage or actions.
- Responsive Design: Build apps for mobile, tablet, and desktop from a single layout.
- Integrated Tools: Add authentication, external APIs, and conditional logic to enhance functionality.
This guide walks you through creating, designing, deploying, and managing your app using Adalo. From setup to app store submissions, you’ll learn how to bring your app idea to life quickly and efficiently.
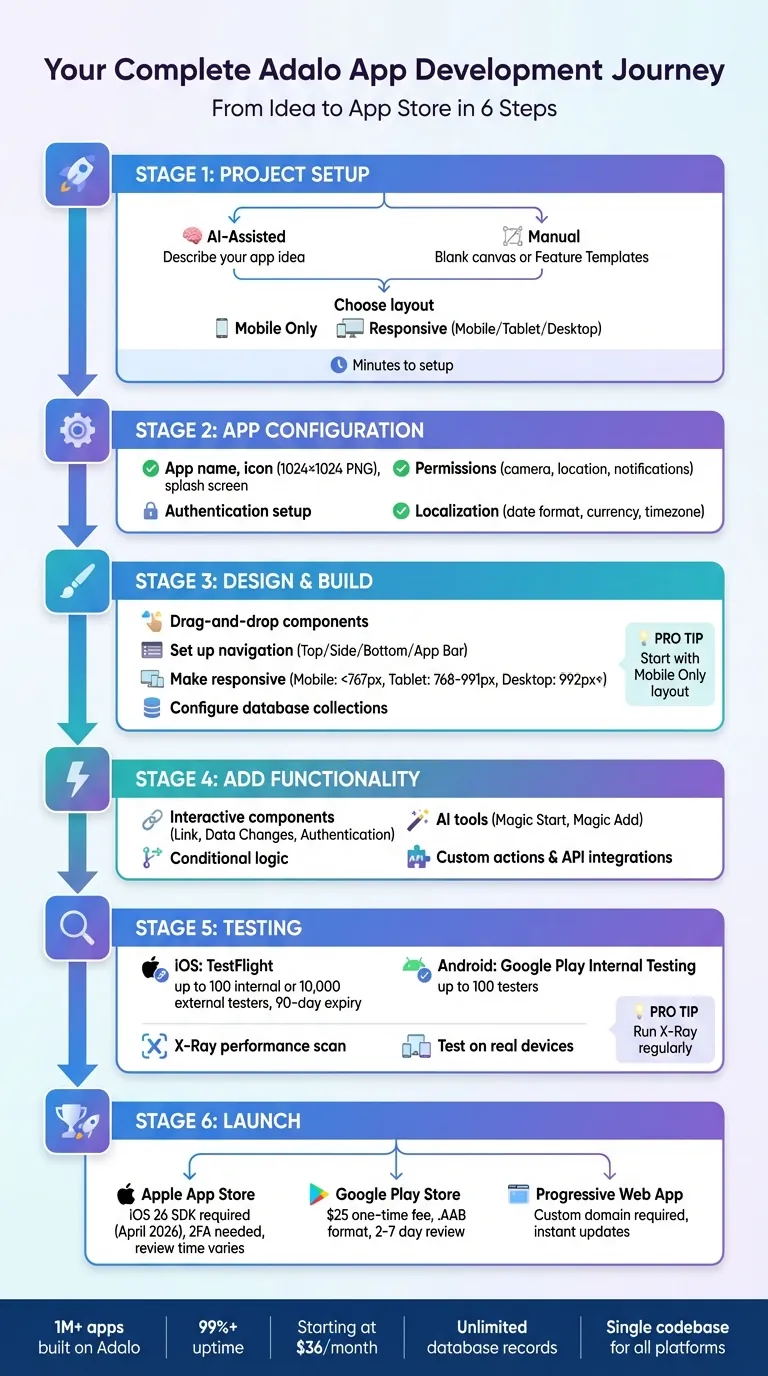
Complete Adalo App Development Workflow: From Setup to Launch
Setting Up Your Project
Creating Your Adalo Project
Head to adalo.com, log in, and click "Create New App". You'll choose between two setup options: AI-assisted setup or manual configuration. Either way, your project can be ready in minutes.
For the AI-assisted setup, describe your app idea in plain language. Type something like "Build a marketplace app for local services" or "Create a fitness tracking app with user login and progress charts." The AI Builder then generates your app's core structure—screens, components, database collections, and basic actions. From there, tweak the design and functionality using drag-and-drop tools.
If you prefer a hands-on approach, manual configuration offers two starting points: a blank canvas for complete creative freedom or Feature Templates for a head start. Templates come pre-loaded with essential features like user profiles, payment systems, appointment scheduling, or social media feeds. These templates handle repetitive groundwork while keeping everything customizable.
An expert once shared that using Feature Templates allowed them to build a working marketplace prototype in just three hours.
Once your project is created, choose between "Mobile Only" or "Mobile, Tablet, and Desktop" (Responsive Apps). The Mobile Only option is optimized for smartphones and works well for beginners. Responsive Apps adapt to larger screens like tablets and desktops but require extra layout adjustments. You can switch between these options later in the App Layout Type settings. This decision ensures your app is optimized for the devices your users prefer.
With project setup complete, you're ready to configure the app's core settings.
Configuring App Settings
Now that your project is ready, head to the App Settings panel to define your app's identity and functionality. Start by naming your app—this is what users will see in app stores and on their home screens. Add a subtitle and description to give users a quick idea of what your app does. Upload a 1024×1024 PNG for your app icon and design a splash screen that aligns with your branding. Double-check that all assets meet app store guidelines to avoid delays during submission.
Use the visual designer to fine-tune your app's look. Adjust fonts (with options from Google Fonts), colors, shapes, borders, and alignments. Preview how your app will look on different devices, ensuring a polished design across platforms.
Next, configure permissions for features like camera access, location services (for maps or distance-based functions), notifications, and storage. Adalo automatically generates the necessary files for iOS and Android, simplifying the process. If your app requires user accounts, set up authentication with email/password logins or social sign-ins. If accounts aren't necessary, disable this feature. These settings are critical for meeting app store requirements and avoiding rejections.
For US-based apps, adjust localization settings: use the MM/DD/YYYY date format, $ USD currency with commas for thousands (e.g., $1,000.00), and imperial units for measurements. Set the default timezone to match your target audience. If you're building a Progressive Web App, configure a custom domain or subdomain here. Since Adalo builds a single app for all platforms, these settings apply consistently across iOS, Android, and web versions.
With these configurations in place, your app is primed for development and ready to deliver a seamless experience across devices.
Designing Your App Interface
Building Screens with the Drag-and-Drop Editor
Start by clicking the + button in the Add Panel, then drag and drop components like lists, buttons, text blocks, and forms onto your canvas. The freeform layout gives you complete control over positioning without grid limitations. This WYSIWYG (What You See Is What You Get) approach makes the design process straightforward and visual.
When you select a component, its configuration panel appears on the left. Tweak styles, fonts, and colors to match your vision. To manage how components stack visually, head to the Screens tab in the left toolbar. This shows a list of all elements on your screen. Drag items up or down in the list to adjust their layering—perfect for overlapping elements like placing buttons over images.
Set primary and secondary colors in the Branding panel, which automatically updates all linked components. For faster editing, select multiple components and group them by clicking "Make Group." This allows you to move or modify them together, saving time during layout adjustments.
If you're new to the platform, learn how to build a mobile app by starting with the Mobile Only layout type to get comfortable before diving into responsive designs. Another helpful tip: use a Feature Template to see how seasoned designers structure screens and configure components. Copy components between screens for quick adjustments and save Design Versions to preserve your work before making major changes.
Once your screens are ready, focus on navigation to ensure a smooth user experience.
Setting Up Navigation and User Flows
Navigation guides users through your app. Keep navigation buttons highly visible and easy to access, ensuring users can return to previous screens without hassle. Follow best practices for usability: tap targets should be at least 44×44 pixels to reduce frustration.
Miller's Law states that people can hold about seven items in their short-term memory. Use this to guide your design: limit each screen to one main action and keep options to seven or fewer. For apps with deeper hierarchies, breadcrumb navigation at the top of the screen helps users track their location. Use consistent colors, icons, and fonts to create clear visual cues that make navigation intuitive.
When adding navigation components like Top Navigation, Side Navigation, Bottom Navigation, or App Bar, avoid placing them inside Sections (pre-designed UI blocks). These elements should remain independent on the screen. Similarly, components set to "Sticky while scrolling"—such as Action Buttons—should not be nested inside Sections or other parent objects, as this can disrupt their fixed positioning. For complex features, consider using expandable menus or modals to simplify the interface and reduce cognitive load.
With navigation in place, your app is ready to adapt seamlessly across different devices.
Making Your App Responsive
Adalo's responsive design tools let you create layouts for mobile, tablet, and desktop—all from a single screen. Use the Screen Size Switcher at the top of the builder to toggle between views: Mobile (up to 767 pixels wide), Tablet (768 to 991 pixels), and Desktop (992 pixels and wider). By default, components use Shared Layout settings, ensuring consistency across all screen sizes. For unique designs on specific devices, switch components to Custom Layout.
Start with the mobile layout, then adjust for larger screens—it's much easier to scale up than shrink down. Use the Rectangle component as a container to group related elements, making it easier to manage how sections shift and scale. For layouts that don't scale well, create separate versions of a section and use visibility toggles to display one on mobile and another on desktop.
Test your design's responsiveness by dragging the yellow borders of the screen in the builder. This real-time preview shows how components behave across breakpoints. Use anchoring constraints to define how components react to screen size changes, such as staying centered or aligning to a side. If a component isn't needed on specific devices, turn off its visibility for that size—this also disables its layout settings, simplifying your edits. The layout automatically adjusts for changes in device orientation, ensuring a polished experience across all screens.
Adalo Beginners Crash Course: The Ultimate Guide
Configuring Your Database
Adalo's built-in relational database is the backbone of your app, designed to store and organize all your information seamlessly—no external tools or complicated setups required. With paid plans starting at $36/month, you get unlimited database records with no caps on storage or actions, making it easy to scale as your app grows.
Creating Collections and Relationships
Collections are the core entities of your app, such as Users, Products, Orders, or Trips. To create one, click the Database icon in the left toolbar, choose Add Collection, and give it a clear, descriptive name. Each collection holds fields that define specific details—Text for names, Number for prices, Image for photos, or Date/Time for timestamps.
To connect your collections, use relationships. In a marketplace app, you might link a "Products" collection to a "Categories" collection using a one-to-many relationship (one category can include multiple products). Set this up by adding a Relationship property to your Products collection and linking it to Categories. Adalo automatically creates reciprocal links between the collections. Rename both sides of the relationship immediately—change generic names like "Collection 2" to something intuitive, such as "Product Category" and "Products in Category." This avoids confusion when pulling data into screens later.
The first property in any collection serves as its label throughout the builder. Choose something unique and meaningful, like a product name or order number, since this will appear in dropdowns and lists. Unlike competitors that impose hard limits or charge usage-based fees for database operations, Adalo's paid plans include no caps on records, actions, or storage—your costs stay predictable as your app scales.
Once your collections are set, you can integrate data from external sources if needed.
Connecting External Data Sources
Adalo allows you to bring in external data from platforms like Google Sheets, Airtable, or SQL databases using External Collections. This feature, available with the Professional plan ($52/month billed annually), leverages REST APIs. To set it up, go to the Database tab, add an External Collection, and configure five standard endpoints: Get All Records, Get One Record, Create, Update, and Delete.
For Airtable, use a Personal Access Token instead of outdated API keys. When setting up the Update endpoint, always use the PATCH method instead of PUT—this ensures only specified fields are updated without overwriting the entire record. For the "Get All" endpoint, specify a Results Key (e.g., "records" for Airtable) to help Adalo locate the data array in the JSON response.
To ensure all fields are correctly detected, create a complete dummy record in your external source. If you're working with Google Sheets as a database, SheetBridge simplifies the connection process—no API knowledge required, and setup completes in about 30 minutes. DreamFactory integration lets you connect to older systems, like legacy ERPs or SQL databases, even if they lack APIs.
Setting Up User Authentication
With your collections configured and external data integrated, secure user access next. Adalo's database includes built-in user authentication. Enable this feature in App Settings to add email and password fields to your Users collection. Integrate third-party authentication options, like Google sign-in, through the marketplace.
To create login and signup flows, use Feature Templates, which provide prebuilt options for these processes. Once users log in, control what they see by applying visibility conditions to components. For example, filter an Orders list to show only records where the User ID matches the currently logged-in user.
If your app has multiple user roles, add a "Role" property to the Users collection. Set it as a Text field with options like "Admin" or "Member." This property allows you to manage access by showing or hiding specific screens and actions based on the user's role. This setup ensures your data stays secure while giving you precise control over user permissions within your app.
Adding App Functionality
Once your database is set up and your screens are designed, bring your app to life by adding functionality. This is where user actions and data interactions come together to create a seamless experience.
Making Components Interactive
Interactive components are the backbone of any app, connecting user actions to database operations:
- Link actions handle navigation, guiding users from one screen to another.
- Data Changes manage the creation, updating, or deletion of records in your database.
- Authentication actions take care of user sign-up, logins, and logouts.
- Mobile-specific features, like push notifications or sharing, add another layer of engagement.
To add an action, select a component in the builder and locate the action panel (usually highlighted in yellow). Configuring a button might involve adding a Create action to save form data to the database, followed by a Link action to redirect users to a confirmation page. For advanced needs, Custom Actions allow integration with external services like payment gateways, email systems, or SMS platforms via API calls.
Once basic actions are in place, enhance them with logic tailored to user roles or specific data conditions.
Building Conditional Logic
Conditional logic makes your app dynamic, enabling it to respond differently based on user roles, data, or other criteria. Adalo simplifies this process with options like conditional actions and visibility.
To set up a conditional action, select a component, go to Show Advanced, and switch the "When does this happen?" option from "Always" to "Sometimes." Define conditions based on properties, operators, and values:
- Text fields can use operators like "Contains" or "Is equal to."
- Numbers allow comparisons like "Is greater than" or "Is between."
- Date fields support options like "Is after" or "Is before."
For components with multiple conditional link actions, always include a fallback link to ensure smooth navigation.
Conditional visibility determines whether a component appears on the screen based on specific conditions. Access this through the kebab menu in the component settings. Show an "Edit" button only if the logged-in user is the creator of a post, or display admin-only controls for users with the "Admin" role.
Using AI to Build Logic
Ada, Adalo's AI builder, lets you describe what you want and generates your app. Magic Start creates complete app foundations from a description, while Magic Add adds features through natural language.
Adalo's AI tools streamline the process of creating logic, especially for complex setups or when you're starting from scratch.
- Magic Start generates a complete app foundation from a simple description. Need a booking app for a dog grooming business? It automatically creates the database, screens, and user flows—what used to take days of planning happens in minutes.
- Magic Add lets you add specific features without manual setup. Instead of configuring a booking calendar step by step, describe your requirements, and the AI handles the rest.
- The ChatGPT Custom Action integration enables functionalities like chatbots, content translation, or data categorization via OpenAI's API. To ensure security, include a unique "state" parameter in authorization requests for AI actions.
Once your logic is in place, use X-Ray, Adalo's AI-powered performance analyzer, to fine-tune your app. It identifies potential bottlenecks—overly complex relationships or lists loading too many records—that can slow down your app as it grows. Running X-Ray during testing ensures your app is optimized to handle increased usage from the start.
Testing Your App
Before submitting your app to the app stores, test it on real devices. While Adalo's editor preview button gives you a glimpse of the web version, it doesn't show how native mobile features will function on actual hardware. Testing on physical iOS and Android devices is essential to identify issues like touch gestures, screen orientation handling, or sensor interactions—problems that could lead to app store rejections or negative user reviews.
Testing on iOS and Android Devices
To test on iOS, set up your Bundle ID and app-specific password in Adalo. After that, launch a TestFlight build. Once Apple processes your build in App Store Connect, invite testers. You're allowed up to 100 testers on the Internal track or up to 10,000 testers on the External track after a beta review is completed. Testers access the beta build through TestFlight, but these builds expire in 90 days.
For Android, download the .AAB file and upload it to the Google Play Console under the Internal Testing section. Create a new release, let Google handle the signing key, and compile a list of up to 100 testers. Share the opt-in URL generated by the Play Console so testers can download the app directly from Google Play. Android .AAB files must be distributed through the Play Console.
During testing, focus on core functions like authentication, data handling, conditional logic, and custom actions. Test device-specific features such as geolocation and camera access. Test your app on a variety of devices—like an iPhone 15 and a Samsung Galaxy—to identify differences in screen sizes, operating system behaviors, and performance under challenging conditions like poor network connectivity.
Once you've completed device testing, finalize your app store submissions.
Finding Performance Issues with X-Ray
After confirming your app's functionality on devices, use diagnostic tools to fine-tune performance. Adalo's X-Ray tool, powered by AI, scans your app for performance bottlenecks. It evaluates database queries, action complexity, and component rendering times, offering recommendations to improve efficiency. Running X-Ray regularly during development—especially after adding new screens or database changes—helps catch issues early.
If you're creating a directory app with over 1,000 records, X-Ray might identify slow backend filtering on lists. It could suggest restructuring database relationships or indexing collections to speed up queries. Making these adjustments ensures your app can handle growth smoothly. Adalo's modular infrastructure supports apps with millions of monthly active users, processing 20 million+ daily requests with 99%+ uptime. X-Ray helps you optimize your app to take full advantage of this scalability.
Publishing to the Apple App Store
After successfully testing your app, the final step is bringing it to market through the Apple App Store. This phase ensures your app meets Apple's high standards before it becomes available to users.
Preparing Your App Submission
Before submitting, gather everything needed for your app listing:
- Short and long descriptions of your app
- Screenshots optimized for various device sizes
- A high-quality app icon
- A privacy policy URL
Your screenshots should highlight the app's main features to help Apple's reviewers understand its functionality. If your app has unique features requiring special instructions, provide clear guidance to assist the review process.
Meeting Apple's Requirements
Apple enforces strict technical and design standards for apps. Starting April 28, 2026, all new apps and updates must be built using the iOS 26 SDK or later. Your app also needs to support IPv6 networks and operate without crashes or serious bugs.
"The guiding principle of the App Store is simple - we want to provide a safe experience for users to get apps and a great opportunity for all developers to be successful." - Apple Developer
Pay close attention to Apple's App Store Review Guidelines. Common reasons for rejection include incomplete features, broken links, placeholder text, or privacy policy issues. Make sure your app delivers exactly what's promised in its listing.
For Adalo users, publishing an iOS build requires two-factor authentication. You'll need to approve sign-ins from a trusted Apple device, such as a Mac, iPhone, iPad, or Apple Watch. Apple no longer supports SMS-based two-factor authentication for developer accounts.
Submitting Your App
Once you've created a TestFlight build in Adalo, head to App Store Connect. Select your build, input the demo account credentials you prepared earlier, and click "Submit for Review". Apple allows two submissions under review at the same time for each platform—one app version and one for additional items like In-App Events or custom product pages.
Keep an eye on your app's status in App Store Connect. If Apple requests changes or rejects your submission, review their feedback carefully. Address the issues, make the necessary updates, and resubmit your app for approval.
Publishing to the Google Play Store
Publishing an app on Google Play has its own set of steps, but the core principles remain consistent. Once you've worked through the earlier setup, prepare for the final stages of launching your Android app. You'll need a Google Developer Account (one-time $25 fee) and an active Adalo plan (Starter, Professional, Team, or Business).
Pre-Build Essentials
Before building your app, create a Firebase Project to obtain two essential files: google-services.json and the Service Account Key. Once these are ready, head to Adalo's "Publish" tab to start a new Android Build. Provide your Package Name, upload the Firebase files, and include a 96×96 pixel transparent notification icon, as per Google's requirements. Adalo generates an Android App Bundle (.AAB), the format required for Google Play submissions since August 2021.
Creating Your Play Store Listing
Your Play Store listing is your app's storefront, so make it count. Provide an App Name, Short and Long Descriptions, an App Icon, a Feature Graphic, and multiple action-oriented screenshots. Google requires at least three screenshots for phones and one for tablets, showing your app in use—splash screens alone won't cut it. Tools like Mockuphone or AppScreens can help create polished, professional-looking screenshots.
Once your visuals are ready, complete the "App Content" section in the Play Console. This step includes submitting your privacy policy, declaring your target audience, and meeting any other required declarations.
Pro Tip: Never change your Package Name after publishing, as it's tied to your app's history and updates.
Navigating Google's Review Process
Google's review process typically takes 2 to 7 days. They provide a tiered release system to help you control how your app reaches users:
| Testing Track | Purpose | Tester Limit | Google Review Required |
|---|---|---|---|
| Internal Testing | Quick quality checks | Up to 100 testers | No |
| Closed Testing | Feedback from targeted groups | Up to 200 email lists (2,000 per list) | Yes |
| Open Testing | Public beta testing | Unlimited | Yes |
| Production | Full release to all users | Unlimited | Yes |
Internal Testing is ideal for fast quality checks, as it doesn't require Google's review. Closed Testing allows targeted feedback from larger groups—up to 200 email lists, with each list supporting up to 2,000 users.
For apps requiring special considerations, like those involving financial services, health, VPNs, or government representation, register as an Organization instead of a Personal account. This requires a D‑U‑N‑S number, and your registration details must match your Dun & Bradstreet profile. Additionally, provide a demo account with login credentials for Google's review team.
Updating and Releasing Your App
When releasing updates, consistency is key. Keep your Package Name and signing certificate intact, update the version number in Adalo, and upload the new .AAB file. If you're moving a build from testing to production, there's no need to re-upload the file.
After uploading, click "Review Release" and then "Start Rollout" to submit it for approval. For testing tracks beyond Internal Testing, specify the availability of your app by selecting countries and regions. Include a feedback URL so testers can report any issues directly to your team.
Deploying as a Progressive Web App
Once your app is live on app stores, broaden your audience by offering it as a Progressive Web App (PWA). PWAs let users access your app directly through a URL, similar to how you would convert Google Sheets to a web app, eliminating the need for downloads. With just one deployment, your app works smoothly across all devices. This approach is perfect for reaching users who prefer not to install apps or for testing your concept before committing to app store submissions.
Enabling PWA Features
To publish your app as a PWA, you'll need a paid Adalo plan—Starter, Professional, Team, or Business—and a custom domain. Unlike Adalo subdomains, PWAs require a custom domain or subdomain (e.g., app.yourdomain.com). These domains typically cost $10–$45 per year.
Here's how to set it up:
- Add your custom domain in the "Domains" tab under Account Settings.
- Configure the necessary CNAME records with your DNS provider. DNS propagation can take anywhere from 30 minutes to 24 hours.
- Once your domain is verified, go to the "Publish" toolbar, select the "Progressive Web App" dropdown, and choose your verified custom domain to enable PWA functionality.
Before publishing, refine your app's branding in the "Branding" and "Settings" tabs. Set your app icon, primary colors, and fonts to reflect your business identity. Publishing requires a manual push—updates made in the builder won't go live until you publish them.
Once everything is configured, your app is ready to be shared as a PWA.
Sharing Your PWA
Sharing your PWA is as simple as distributing the URL. Users can access it through any browser, and on mobile devices, they can add it to their home screen for a native app-like experience. Test your PWA on actual mobile devices to ensure it performs as expected, as desktop preview mode may not fully replicate mobile behaviors.
If you want to go further with features like push notifications or offline alerts, tools like Progressier can help. Progressier offers a 14-day free trial and can host the required files to overcome limitations with native service worker support. It also provides a unified installation page for a consistent experience across platforms.
Managing Your App After Launch
Launching your app is just the starting line. The real challenge begins when users start engaging with it. From tracking performance to rolling out updates and gathering feedback, keeping your app running smoothly is an ongoing process. Adalo's infrastructure handles the backend complexities, leaving you free to focus on refining and improving your app. Post-launch management plays a crucial role in keeping users happy and ensuring your app continues to grow.
Tracking Performance and User Behavior
Understanding how users interact with your app is essential. Adalo's built-in Analytics tab gives you key insights—where your users are located, how many are active daily, and which screens are most visited. For a deeper dive, integrate Google Analytics through the Settings menu to track detailed user behavior. The X-Ray tool helps you stay ahead of potential issues by scanning for bottlenecks in logic, database queries, and component rendering. It generates load-time reports and suggests specific optimizations for your app.
"Every single time your app queries the database... carries out complicated logic... or talks to a third-party network... app performance will suffer." – Adalo Help Documentation
Metrics like user retention, session length, and database query efficiency give you a clear picture of whether your app is delivering value and handling growth effectively. Adalo's modular infrastructure scales to serve apps with over one million monthly active users, processing millions of requests daily with consistent uptime. These insights make it easier to fine-tune your app and ensure smooth updates across platforms.
Releasing Updates Across Platforms
One of Adalo's standout features is its single-codebase system. Make changes once, and they sync automatically across web, iOS, and Android. Updates are simple: edit your app in the Adalo editor, test performance with X-Ray, preview on simulated devices, and hit "Publish." While web and PWA updates go live in seconds, app store updates require resubmission, which typically takes 1–7 days for approval. Adalo's paid plans, starting at $36/month, include unlimited updates with no usage-based charges.
Before publishing, test updates thoroughly—ideally on physical devices—to catch platform-specific issues that desktop previews might miss. Scheduling updates during low-usage times can also help minimize disruptions. With Adalo's 99%+ uptime infrastructure, your updates will roll out reliably. Once updates are live, user feedback becomes your guide for continuous improvement.
Collecting and Using User Feedback
Adalo makes it easy to gather feedback directly within your app. Embed custom feedback forms using Adalo's database collections, allowing users to submit ratings, comments, and feature requests. These inputs are stored relationally, making them easy to analyze. For external tools, integrations with Zapier let you send feedback to platforms like Google Forms or Slack, where you can organize it by type—bug reports, feature requests, or usability issues.
Use analytics to identify patterns in user behavior and pinpoint areas for improvement. If retention drops on a particular screen, X-Ray can identify the slow actions causing friction, such as unoptimized lists or filters. These backend processes handle 99% of the workload, so optimizing them can significantly improve user experience.
Show users their voices matter by acting on their feedback. Start with quick fixes, like addressing small bugs or making minor UI improvements. Then, prioritize larger updates that will have the biggest impact on your audience. This approach not only enhances your app but also builds trust and loyalty among your users.
Conclusion
Launching your app across iOS, Android, and the web no longer has to be a drawn-out process. With Adalo, everything—from project setup to app store publishing—is handled on one platform. You build your app once and deploy it everywhere.
The drag-and-drop editor simplifies design, while AI tools like Magic Start and Magic Add speed up development by generating app components and integrating features. Adalo's built-in database removes the hassle of relying on external services, and tools like X-Ray help you identify and fix performance issues before they impact users.
Publishing is straightforward. With one click, release your app to the Apple App Store, Google Play Store, or as a Progressive Web App. Updates sync seamlessly across all platforms, so changes made in the editor are reflected everywhere. At $36/month, Adalo offers unlimited usage, no caps on database records, and unlimited app updates—keeping costs clear and predictable.
After launch, Adalo's integrated analytics, X-Ray monitoring, and feedback tools ensure your app runs smoothly. Whether you're an entrepreneur creating your first MVP, a business turning data into a mobile app, or an agency building apps for clients, Adalo removes the technical barriers that often slow down development. This allows you to focus on refining your ideas and delivering value to your users instead of wrestling with infrastructure or coding complexities.
Ready to get started? Begin with Adalo's free plan to explore its features. Use Feature Templates to speed up development, and publish your first app as a Progressive Web App before moving on to app store releases. Your app journey starts here.
Related Blog Posts
- How to Launch Your First Mobile App Without Coding
- How to Create a Voice To Text Feature For Your App
- How to Build an Employee Onboarding App Without Coding
- How to Build a Responsive Mobile App Without Code
FAQ
Why choose Adalo over other app building solutions?
Adalo is an AI-powered app builder that creates true native iOS and Android apps. Unlike web wrappers, it compiles to native code and publishes directly to both the Apple App Store and Google Play Store from a single codebase—the hardest part of launching an app handled automatically. At $36/month with unlimited database records and no usage-based charges, it offers the most predictable pricing for native app publishing.
What's the fastest way to build and publish an app to the App Store?
Adalo's drag-and-drop interface and AI-assisted building let you go from idea to published app in days rather than months. Magic Start generates complete app foundations from a simple description, and Magic Add lets you add features by describing what you want. Adalo handles the complex App Store submission process, so you can focus on your app's features instead of wrestling with certificates and provisioning profiles.
How much does it cost to build and publish a mobile app with Adalo?
Adalo's paid plans start at $36/month and include unlimited database records, unlimited actions, and unlimited app updates. Unlike competitors that charge usage-based fees (Bubble's Workload Units, for example), Adalo's pricing is predictable—your costs stay the same as your app scales. The Professional plan at $52/month adds external collections for connecting to Google Sheets, Airtable, or SQL databases.
Can I build apps for both iOS and Android from one project?
Yes. Adalo uses a single codebase that publishes to iOS, Android, and web simultaneously. Make changes once in the editor, and they sync across all platforms. This eliminates the need to maintain separate codebases or hire platform-specific developers.
How do I make my Adalo app work on different screen sizes?
Adalo's responsive design tools let you create layouts for mobile, tablet, and desktop from a single screen. Use the Screen Size Switcher to toggle between views and set components to Shared Layout for consistency or Custom Layout for device-specific designs. Start with the mobile layout first, then adjust for larger screens using anchoring constraints and visibility toggles.
What is the X-Ray tool and why should I use it?
X-Ray is Adalo's AI-powered performance analyzer that scans your app for bottlenecks in database queries, action complexity, and component rendering times. Running X-Ray during development helps catch issues early—like slow backend filtering on large lists—and provides specific recommendations to optimize your app before launch. This ensures your app can handle growth and delivers a smooth user experience.
Can I connect my Adalo app to external data sources like Google Sheets?
Yes. Adalo supports External Collections that connect to platforms like Google Sheets, Airtable, or SQL databases via REST APIs. For Google Sheets specifically, SheetBridge simplifies the connection process with no API knowledge required—setup completes in about 30 minutes. The Professional plan ($52/month) includes full external collection functionality.
How long does it take for apps to get approved on the Apple App Store and Google Play?
Apple's review process typically takes 1-7 days, while Google Play reviews usually take 2-7 days. To avoid delays, ensure your app meets all requirements including complete features, working links, proper privacy policies, and appropriate screenshots. Adalo simplifies the submission process by generating necessary files and guiding you through platform-specific requirements.
Do I need coding experience to build an app with Adalo?
No coding experience is required. Adalo's drag-and-drop editor and AI-assisted setup tools like Magic Start generate your database, screens, and logic automatically. You can describe what you want to build in plain language, and the AI Builder creates the core structure. From there, customize everything visually without writing code.
Can Adalo apps scale to handle large numbers of users?
Yes. Adalo's modular infrastructure supports apps with over one million monthly active users, processing 20 million+ daily requests with 99%+ uptime. Unlike app wrappers that hit performance constraints under load, Adalo's purpose-built architecture maintains performance at scale. Paid plans include no caps on users, records, or actions.