5 Steps to Add GraphQL Endpoints in Adalo
This guide walks you through the complete process of integrating GraphQL into Adalo, a no-code app builder for database-driven web apps and native iOS and Android apps—one version across all three platforms, published to the Apple App Store and Google Play.
This guide walks you through the complete process of integrating GraphQL into Adalo, from endpoint preparation to deployment.
Key Steps:
- Prepare Your Endpoint: Test your GraphQL API for accessibility, JSON format, and authentication.
- Create an External Collection: Connect your GraphQL endpoint in Adalo and configure authentication.
- Define Queries and Mutations: Use GraphQL queries to fetch data and mutations to update or create records.
- Set Headers and Parameters: Ensure proper headers (e.g.,
Authorization) and specify JSON keys for data parsing. - Test and Deploy: Bind data to app components, test functionality, and publish your app.
Adalo supports numeric IDs for records and has a rate limit of 5 requests per second. Following these steps ensures smooth integration and optimized app performance. With unlimited database records on paid plans and no usage-based charges, you can scale your GraphQL-connected app without worrying about data caps or unexpected bills.
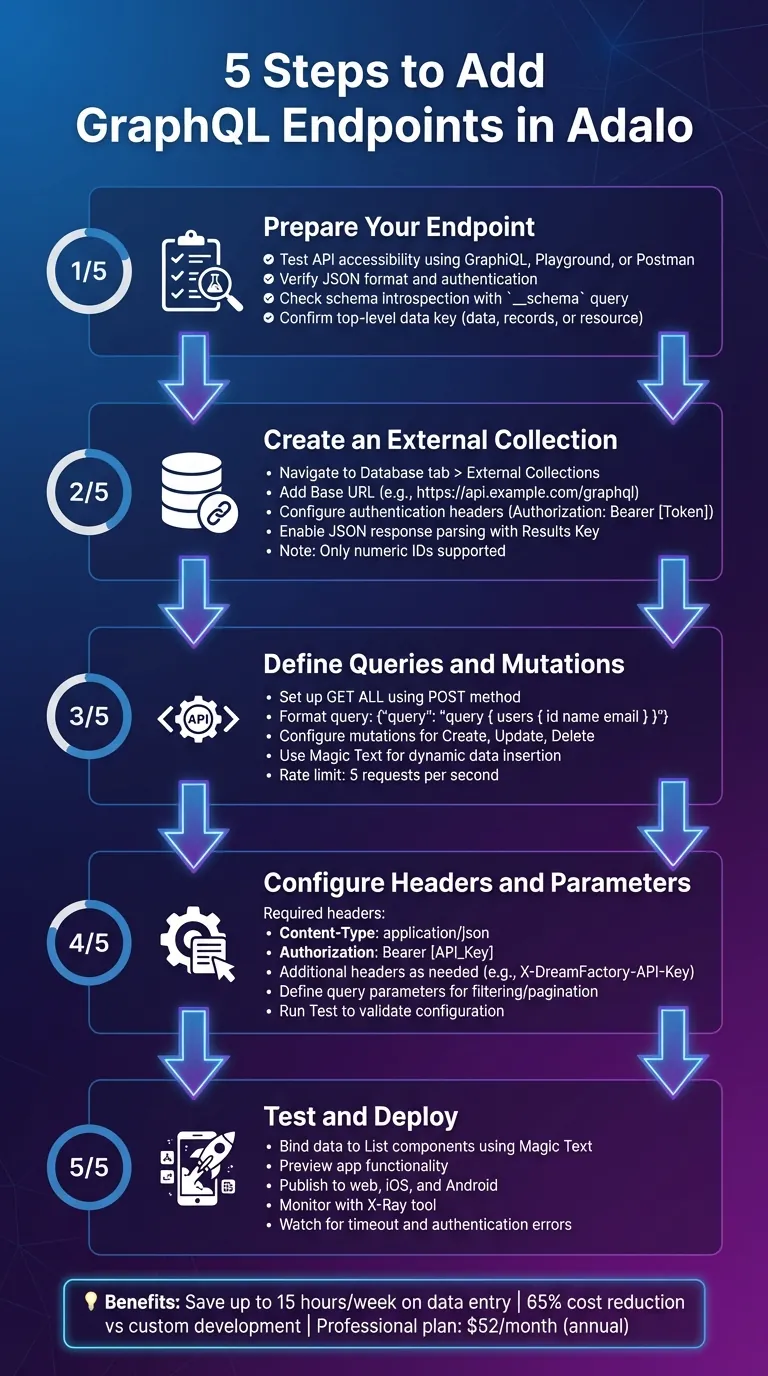
5-Step Process to Add GraphQL Endpoints in Adalo
Why Adalo Works for GraphQL Integration
GraphQL's ability to request exactly the data you need pairs naturally with Adalo's architecture. The platform's 3-4x faster performance since the Adalo 3.0 infrastructure overhaul means your GraphQL queries return data to users quickly, even as your app scales. Unlike platforms that impose record limits or usage-based charges, Adalo's paid plans include no data caps—your External Collections can grow alongside your user base.
Ada, Adalo's AI builder, lets you describe what you want and generates your app. Magic Start creates complete app foundations from a description, while Magic Add adds features through natural language.
The AI-assisted building features also simplify the integration process. Magic Add lets you describe new features in natural language, and the platform generates the necessary screens and logic to display your GraphQL data. X-Ray identifies performance bottlenecks before they affect users, helping you optimize queries that might slow down your app.
Step 1: Prepare Your GraphQL Endpoint
Before diving into the integration process, ensure your endpoint is functioning correctly. Think of this as your pre-flight checklist: confirm the endpoint is accessible, returns data in proper JSON format, and accepts valid authentication.
Verify Endpoint Accessibility
Start by testing your endpoint using tools like GraphiQL, GraphQL Playground, or Postman. Typical endpoint URLs might look like this: https://api.example.com/graphql, /api/graphql, or /v1/graphql.
Send a simple query, such as { __typename }, to verify the endpoint's reachability and confirm it responds correctly. Next, check if schema introspection is enabled by querying __schema. This will give you a detailed map of the available types, fields, and operations, helping you understand what data you can request.
Be aware that GraphQL often returns an HTTP 200 OK status even when errors occur. Errors will appear in the errors array of the response. For example, try querying an invalid field to see if the response includes a GRAPHQL_VALIDATION_FAILED error.
Finally, confirm the response is structured in the JSON format that Adalo requires. Pay close attention to the top-level key where your data resides, such as data, records, or resource. This detail is critical when setting up your External Collection in Adalo.
Once you've confirmed the endpoint is accessible and formatted correctly, move on to validating your authentication setup.
Gather Authentication Credentials
Most secure GraphQL endpoints require authentication, and there are a few common methods: API Keys, Personal Access Tokens (PAT), or OAuth 2.0 tokens (often in JWT format). These credentials are typically added to HTTP headers like this:
Authorization: Bearer YOUR_TOKEN_HERE
Here's a quick reference for some common services:
| Service Provider | Credential Type | Header Key | Value Format |
|---|---|---|---|
| Airtable | Personal Access Token | Authorization | Bearer [Token] |
| DreamFactory | API Key | X-DreamFactory-API-Key | [Key] |
| Any GraphQL API | JWT / OAuth Token | Authorization | Bearer [Token] |
Where you get these credentials depends on your API provider. For Airtable, you'll find the option to create a Personal Access Token in the Developer Hub under your account settings. Make sure to assign the necessary scopes (like read/write access) and specify which databases the token can access. For DreamFactory, API keys are created and managed within the platform using Role-Based Access Controls.
To test your authentication, include the credentials in your request headers when sending queries through GraphiQL or Postman. If the endpoint returns data instead of an authentication error, you're good to go.
Step 2: Create an External Collection in Adalo
Now that your GraphQL endpoint is verified and you have your authentication credentials ready, it's time to connect your data source to Adalo. This step essentially turns your external data into a collection that functions seamlessly within your app.
Navigate to External Collections
Start by opening the Adalo Builder. On the left-hand toolbar, click the Database tab (look for the database icon). Under the "External Collections" section, select + Add Collection. Give your collection a name that reflects the type of data you'll be working with, like "Products" or "Users." This naming step helps keep everything organized, especially as you add more integrations later.
Once named, you'll move on to configuring the endpoint and authentication details.
Configure Endpoint and Authentication
In the setup screen, enter your GraphQL endpoint in the Base URL field (e.g., https://api.example.com/graphql). Then, set up your authentication by clicking + Add Item under Headers. Add a header with the name "Authorization" and the value Bearer [Your_Token]. Be sure to include a space after "Bearer."
Adalo supports both Basic Auth and OAuth for external collections. For most GraphQL endpoints, you'll likely use Basic Auth with an API key or an OAuth token. Keep in mind that Adalo expects your GraphQL endpoint to return data in standard REST-like JSON format.
After completing the authentication setup, you'll need to enable JSON response parsing.
Enable JSON Response Parsing
GraphQL responses often nest data within specific JSON keys like data, records, or items. To help Adalo correctly interpret this structure, specify a Results Key in the "Get All Records" section of your endpoint configuration. This tells Adalo where to look for the array of records in the JSON response.
Make sure at least one record exists in your data source during this step. When you click Run Test, Adalo will analyze the JSON response and automatically generate corresponding properties for your app, such as Text, Number, or Date fields.
It's worth noting that Adalo currently only supports numeric IDs in External Collections. If your GraphQL endpoint uses text-based IDs, UUIDs, or IDs with special characters, you may need to use a workaround. A proxy service like n8n can help by converting GraphQL responses into an Adalo-compatible JSON format.
Step 3: Define GraphQL Queries and Mutations
With your endpoint verified and external collection configured, it's time to link GraphQL operations to Adalo's data actions. This step is crucial for connecting your app's interface to the GraphQL backend, allowing seamless data retrieval and updates through queries and mutations.
Define Queries for Data Retrieval
Adalo's External Collections support five key actions: Get All, Get One, Create, Update, and Delete. For GraphQL, these actions all use the same base URL and require the POST method—even when retrieving data. Instead of traditional query strings, GraphQL embeds its queries directly in the request body.
For example, when setting up the "Get All Records" endpoint, format your JSON body like this:
{"query": "query { users { id name email } }"}.
Set the Results Key to align with your API's response structure. This could be something like data.users or just users, depending on the API's design.
After configuring the endpoint, click Run Test to generate collection properties. Make sure your external data source includes at least one complete record before testing. If a field is empty across all records, Adalo won't detect that property during the setup.
Once your queries are in place, it's time to move on to configuring mutations for data updates.
Configure Mutations for Data Updates
Mutations are used for creating, updating, and deleting records in your GraphQL backend. For the "Create a Record" action, format your mutation in the request body like this:
{"query": "mutation CreateUser($name: String!, $email: String!) { createUser(name: $name, email: $email) { id name email } }", "variables": {"name": "VALUE", "email": "VALUE"}}.
Replace "VALUE" with Magic Text to dynamically insert data from your app.
When setting up the "Update a Record" action, the structure is similar, but you'll also need to reference the specific record ID to modify. Even though GraphQL uses POST for all operations, you can adjust the method to PATCH if you're only updating certain fields.
After configuring each mutation, run a test to ensure the response structure matches your expectations. Keep in mind that Adalo has a platform rate limit of 5 requests per second. If you exceed this limit, you'll encounter a 429 status code. However, with no usage-based charges on any Adalo plan, you won't face unexpected bills from high request volumes—just design your queries efficiently to stay within the rate limit.
Once your queries and mutations are tested and working, you're ready to move on to configuring headers and parameters in the next step.
Step 4: Configure Request Headers and Parameters
With your queries and mutations ready, the next step is to set up the appropriate headers and parameters to ensure seamless communication with your GraphQL endpoint. This step is crucial for verifying your identity and formatting your data correctly, as missing or incorrect headers can cause your requests to fail.
Add Required Headers
For every GraphQL request in Adalo, you'll need at least two headers: Content-Type and Authorization. Set the Content-Type to application/json to indicate the format of your data. The Authorization header should include your API key in the format Bearer [Your_API_Key], making sure to leave a space between "Bearer" and your token.
"All requests to the Adalo API will need to contain the following two headers: Authorization: Bearer [Your App's API Key] Content-Type: application/json"
– Adalo Resources
Depending on your backend, you might need additional headers. For instance, if you're working with DreamFactory, you'll need to include an X-DreamFactory-API-Key header with your specific key. To add these headers in Adalo, navigate to the "Headers and Queries" section, click +Add Item, and manually input the header name and its value.
Define Query Parameters
While GraphQL typically sends data in the request body, some APIs require query parameters for tasks like filtering, pagination, or even authentication. To add these parameters in Adalo, click Add Item under External Collections and input the required parameter names and values. Some APIs may use query parameters for authorization instead of headers, so it's essential to consult your API's documentation to ensure accuracy.
If your endpoint returns nested data, you'll need to specify a Results Key (e.g., data.users or records) to help Adalo locate the specific JSON key containing your records. This step is especially important for GraphQL responses structured with multiple layers of data.
Run Tests to Validate Configuration
Once everything is set up, use the Run Test feature to send a live request to your endpoint. A successful test will allow Adalo to automatically detect and map the data properties based on the API's response. Before running the test, make sure your external data source includes at least one complete record for validation.
If the test fails, check the error message displayed in the Adalo modal. Common issues include authentication errors, malformed JSON, or incorrect URLs. The Show Full Response option can help you inspect the raw data and verify that all necessary fields are being returned.
After confirming that your settings work correctly, you're ready to move on to binding data in the next step.
Step 5: Test, Bind, and Deploy Your App
Now that your GraphQL endpoint is set up and tested, it's time to connect your data to your app's interface and get it ready for deployment. With everything configured, you can seamlessly bind your data to your app's UI. External Collections function just like native data sources in Adalo.
Bind Data to Screens and Components
To display data from your GraphQL endpoint, start by adding a List component to your app. Set its data source to your External Collection. During the "Run Test" phase, Adalo automatically detects the properties available in your API response, making them accessible through Magic Text.
To map specific data fields from your GraphQL response to your app's UI, tap the Magic Text icon in the component settings (e.g., Title, Subtitle, or Image) and select the corresponding JSON keys. For detail screens, you can link list items to new screens by using the following steps: Add Action > Link > New Screen. Adalo will automatically pass the "Current [Collection Item]" data to the new screen, allowing you to use Magic Text to display specific details from the selected record.
If your GraphQL schema changes or you add new fields, simply go back to the Database tab, update the External Collection settings, and re-run the connection test to make the new fields available in the editor. With Adalo's visual builder—described as "easy as PowerPoint"—you can quickly adjust your UI to accommodate new data fields without touching code.
Preview and Publish the App
Click the Preview button to ensure your data loads correctly and all actions work as expected. The 3-4x faster performance from Adalo 3.0's infrastructure means your GraphQL data loads quickly even with complex queries.
Once you've confirmed everything is functioning, you can publish your app to the web, iOS App Store, and Android Play Store using Adalo's single-codebase system. Any updates you make will automatically reflect across all platforms, so there's no need to rebuild for each one. This is a significant advantage over platforms like Bubble, where mobile apps are web wrappers that require separate management and don't automatically sync updates across web and mobile deployments.
Monitor Performance and Debug Issues
Once your app is live, Adalo's X-Ray tool can help you analyze performance and troubleshoot any integration issues. X-Ray identifies potential bottlenecks before they affect users, highlighting slow queries or inefficient data relationships that might impact your GraphQL integration.
Keep an eye on request frequency to avoid hitting API rate limits. Some common issues to watch for include timeout errors caused by large payloads and authentication problems due to missing or incorrect headers. Regular monitoring will ensure your app runs smoothly for users.
With Adalo's modular infrastructure scaling to serve apps with 1M+ monthly active users, your GraphQL-connected app can grow without hitting platform-imposed ceilings. Unlike platforms that charge based on workload units or impose record limits, Adalo's architecture maintains performance at scale without surprise costs.
Conclusion
Adding GraphQL endpoints to your Adalo app simplifies data fetching and reduces the need for extensive custom coding. By following these five steps—preparing your endpoint, setting up an External Collection, defining queries and mutations, configuring headers, and testing thoroughly—you can connect your app to robust external backends while keeping your frontend efficient and user-friendly.
Organizations have reported saving up to 15 hours per week on manual data entry and cutting costs by 65% compared to custom development.
"GraphQL allows you to answer API queries using your pre-existing data... it offers customers the power to request only the information they want and nothing more." - n8n
For better performance, consider using PATCH instead of PUT, apply filters to stay within the 5-requests-per-second rate limit, and use Adalo's X-Ray tool to identify potential issues. These small adjustments can significantly improve your app's responsiveness.
The Adalo Professional plan, starting at $36 per month, provides access to External Collections with unlimited database records and no usage-based charges. This unlocks immediate savings in engineering time and ensures your app scales effortlessly. With GraphQL, your data integrates seamlessly into lists, forms, and actions—no coding required.
FAQ
Why choose Adalo over other app building solutions?
Adalo is an AI-powered app builder that creates true native iOS and Android apps. Unlike web wrappers, it compiles to native code and publishes directly to both the Apple App Store and Google Play Store from a single codebase—the hardest part of launching an app handled automatically.
What's the fastest way to build and publish an app to the App Store?
Adalo's drag-and-drop interface combined with AI-assisted building features like Magic Start and Magic Add lets you create apps quickly. The platform handles the entire App Store submission process, so you can go from idea to published app without managing certificates, provisioning profiles, or app review guidelines manually.
How can I make sure my GraphQL endpoint works properly with Adalo?
Start by confirming your endpoint supports standard GraphQL queries and mutations. Run tests using GraphiQL, GraphQL Playground, or Postman to ensure it delivers properly structured JSON responses. Verify the endpoint is accessible and returns data with numeric IDs, which Adalo requires for External Collections.
What types of authentication can you use to connect GraphQL endpoints in Adalo?
Adalo supports API keys, OAuth tokens, and JWT-based authentication for GraphQL endpoints. Add your credentials to the Authorization header in the format "Bearer [Your_Token]". The specific method depends on your API provider's requirements.
What are the best ways to improve app performance when using GraphQL with Adalo?
Use PATCH instead of PUT for partial updates, apply filters to reduce payload sizes, and stay within the 5-requests-per-second rate limit. Adalo's X-Ray tool identifies performance bottlenecks before they affect users, helping you optimize slow queries or inefficient data relationships.
How long does it take to build a GraphQL-connected app in Adalo?
With your GraphQL endpoint already prepared, you can connect it to Adalo and build a functional app in a few hours. Magic Start generates complete app foundations from descriptions, and the visual builder—described as "easy as PowerPoint"—lets you create screens and bind data without coding.
Do I need coding experience to integrate GraphQL with Adalo?
No coding is required. Adalo's External Collections feature handles the technical complexity of GraphQL integration. You configure endpoints, headers, and queries through a visual interface, and Magic Text lets you bind data to UI components without writing code.
How much does it cost to build a GraphQL-connected app with Adalo?
The Adalo Professional plan starts at $36/month and includes External Collections, unlimited database records, and no usage-based charges. Unlike platforms like Bubble that charge based on workload units, Adalo's pricing is predictable with no bill shock.
Can I publish my GraphQL-connected app to the App Store?
Yes. Adalo publishes native iOS and Android apps directly to the Apple App Store and Google Play Store from a single codebase. Updates sync automatically across all platforms—you don't need to rebuild or resubmit for each platform separately.
What happens if my GraphQL data grows significantly?
Adalo's paid plans have no record limits, so your External Collections can scale with your data. The platform's modular infrastructure supports apps with 1M+ monthly active users, and the Adalo 3.0 backend delivers 3-4x faster performance than previous versions.