Building White Label SaaS Apps with Adalo for Agencies
Want to build apps for clients without the heavy lifting? White-label SaaS apps let agencies create one core app and customize it for multiple clients - saving time and cutting costs. With Adalo, you can build, brand, and publish apps for iOS, Android, and web using a single platform. Here’s why agencies are turning to Adalo:
- Flat pricing: Plans start at $36/month with no usage-based fees.
- Cross-platform publishing: One build works on iOS, Android, and web.
- Fast setup: Launch apps in days, not months, using modular templates.
- Scalability: Handles up to 1M+ users and 20M daily data requests.
Ada, Adalo's AI builder, lets you describe what you want and generates your app. Magic Start creates complete app foundations from a description, while Magic Add adds features through natural language.
Adalo’s tools like Magic Start and dynamic branding make customization easy, even for non-technical teams. Whether it’s a booking app, marketplace, or membership platform, you can deliver polished apps faster and more affordably. Let’s break down how it works.
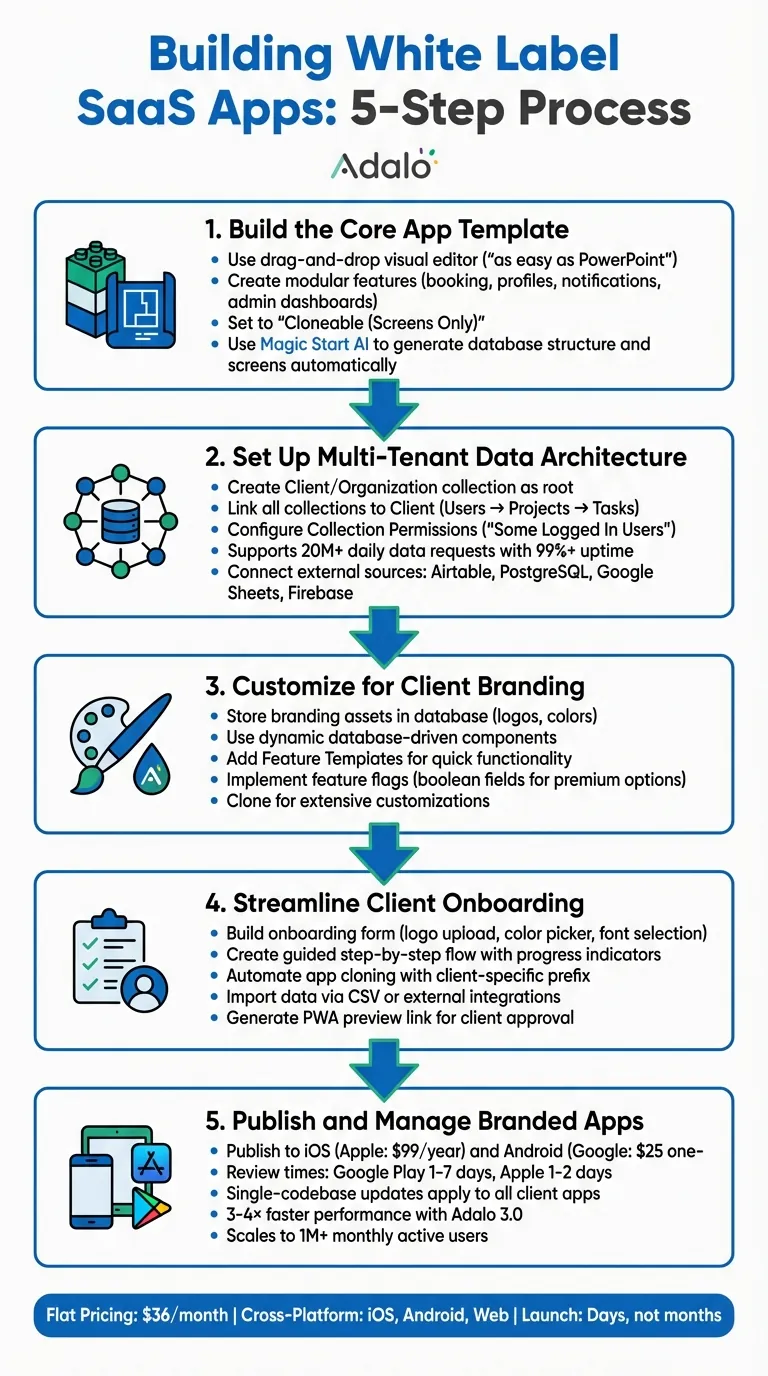
5-Step Process for Building White Label SaaS Apps with Adalo
Step 1: Build the Core App Template
Create a Modular Base App
A successful white-label business starts with a modular base app that can be easily tailored for different clients. With Adalo's visual editor, building this foundation is simple. The drag-and-drop interface - described by users as "as easy as PowerPoint" - offers a horizontal ribbon for account settings and previews, a central canvas with real-time updates, and tools for database and backend setup.
To create modular features, rely on pre-designed templates. For instance, when designing a booking app template, you can develop a reusable booking module that includes a calendar, user authentication, and payment processing. Add other modules, like user profiles, notifications, and admin dashboards, to complete the app. This modular setup allows you to enable or disable specific features for each client, making customization quick and efficient.
Reusability hinges on well-designed logic flows. Use custom actions to automate processes, like sending confirmation emails after a booking or filtering data based on user roles. These actions can be linked to database queries or external APIs - all without writing code. Built-in user authentication tools make it easy to add secure sign-up and login screens to your template, ensuring consistent user management across different client instances.
Once your base template is ready, set it to "Cloneable (Screens Only)" in the app settings. This enables you to duplicate the entire structure - screens, components, actions, and database schema - for new clients while keeping the database records empty. This approach speeds up setup and maintains consistency across projects.
With your modular base in place, you can use AI tools to streamline further customization.
Use AI Builder for Faster Template Creation
Adalo’s Magic Start feature accelerates the process of building your template. Just describe your needs - like "a booking app for a salon with user authentication and payment processing" - and the AI generates the database structure, screens, and user flows automatically. This frees you to focus on fine-tuning the app instead of spending time on the initial setup.
Magic Add takes this a step further by letting you integrate new features through natural language prompts. For example, typing "add a booking calendar with user authentication" prompts the tool to create the necessary components, logic flows, and database connections. The AI produces modular, database-driven features with dynamic components that are ready for visibility rules and external integrations, making it easy to adapt one core template for multiple clients.
Before finalizing your template, use the X-Ray diagnostic tool to catch any performance or scalability issues. This AI-powered feature highlights potential problem areas, like inefficient database queries or components that could slow the app under heavy use, so you can address them early in development.
"What I love about Adalo is that I'm able to create a really quick sequence to test an idea a client has to see if we can reasonably achieve what they want for their MVP." – Christina Cheng
Step 2: Set Up Multi-Tenant Data Architecture
Configure User-Specific Data Visibility
In a multi-tenant setup, each client's data needs to remain isolated. Start by creating a Client or Organization collection as the root of your database structure. Then, link all other collections - like Users, Projects, Transactions, and Reports - back to this Client collection using relationship properties. For example: Client → Users → Projects → Tasks. Each record should reference its parent Client, which allows you to filter data automatically based on the client ID.
To enforce this isolation, use Collection Permissions in Adalo's database builder. Click the "Shield and Key" icon, set permissions to "Some Logged In Users", and define a relationship property linking to the Users collection. This ensures data is restricted at the database level, not just hidden in the app's interface.
When building dashboards, filter data queries to display only records where record.client_id = currentUser.client_id. Adalo’s infrastructure supports 20 million+ daily data requests with a 99%+ uptime guarantee.
"Visibility rules will only hide UI components within the app but not the data that is accessible to the app. Setting up the permissions will ensure only the data that should be accessible, is accessible to the app." – Adalo Help Documentation
For added security, combine database permissions with screen-level visibility rules. Lists should only display relevant records, and permissions should reinforce those restrictions. Keep in mind that "Some Logged In Users" permissions currently support relationships up to two levels deep, so design your database schema accordingly.
Once internal data isolation is solid, you can expand your architecture by linking external data sources.
Connect to External Data Sources
If you’re managing multiple clients' data across various app instances, Adalo's External Collections Integration can connect to platforms like Airtable as a database, PostgreSQL, Google Sheets, Firebase, or any JSON REST API. This is especially useful for maintaining a centralized database while deploying customized apps for individual clients.
To maintain data isolation with external sources, follow the same hierarchical structure: ensure your external database has a Client or Organization table as its root. When integrating with Adalo’s API (available on the Professional plan at $36/month), filter queries by tenant. Store each client’s unique record ID from the external database in your Adalo Users collection for accurate filtering.
Performance becomes a key factor when scaling multi-tenant apps. For example, in Airtable, you can create filtered views - such as an "Active Clients Only" view - to pre-filter data before it’s sent to your app. This approach minimizes API load and helps you stay within Airtable's rate limit of 5 requests per second per base. If you need more robust backend filtering for unlimited records, Adalo’s Team and Business plans include Xano integration, which eliminates the limitations of spreadsheet-based solutions.
When mapping external data, make sure every column has at least one populated record. Adalo’s API integration won’t detect empty columns during setup. Also, note that as of February 1, 2026, Airtable requires Personal Access Tokens instead of API keys. Configure these tokens with the necessary scopes: data.records:read, data.records:write, and schema.bases:read [33,34].
Step 3: Customize for Client Branding
Use Database-Driven Components for Dynamic Branding
Instead of embedding client branding directly into your app template, store these assets in your Adalo database. Set up a "Client Settings" or "Branding" collection with fields for logos and hexadecimal color codes. This setup allows you to manage branding for an unlimited number of clients, all from a single app codebase.
To make this work, link each user to their client's branding record using a relationship property. When a user logs in, the app automatically retrieves their organization's logo and color scheme by following a data path like: Logged in User > Client > Logo.
Adalo makes it easy to apply these branding elements dynamically. For example, you can configure the color property in your manifest.json file when building custom components. This allows you to bind colors to variables like @primary or @secondary, or even pull them directly from the database. The platform also includes a @contrast property, which ensures text remains readable by automatically adjusting between black and white based on the background color.
For agencies managing multiple clients, this approach is a game-changer. Updates to the master app template - like bug fixes or new features - automatically roll out to every client without requiring individual updates. This system not only simplifies branding but also enables seamless integration of additional custom features.
Add Features Tailored to Each Client
Adalo's Feature Templates make it simple to add functionality without starting from scratch. These pre-built modules include designed screens, actions, and database collections. For instance, if a client requests a booking system, you can integrate the Appointment Booking template in just a few minutes instead of spending days building it manually.
For more granular customization, implement a feature flag system. Add boolean fields to your Client collection (e.g., has_advanced_analytics, has_push_notifications, has_payment_processing) and use conditional visibility rules to toggle features on or off. This lets you offer a standard set of features while enabling premium options for clients who need them - all within the same app.
If a client requires highly specific changes that could disrupt your shared codebase, Adalo’s Clone function is your solution. Cloning creates a separate app with its own database, keeping extensive customizations isolated from your master template and other clients. This ensures flexibility without sacrificing stability.
Adalo Crash Course | Adalo Tutorial for Beginners 2024
Step 4: Streamline Client Onboarding
After setting up your modular template and dynamic branding, it's time to streamline the client onboarding process. This ensures you can quickly deliver customized apps tailored to each client.
Build Onboarding Flows
Start by creating an onboarding form to collect all the necessary branding details from your clients. Include fields like:
- Image uploads for logos
- Text inputs for hexadecimal color codes or a color picker
- Dropdown menus for font preferences (e.g., Google Fonts)
- Checkboxes for optional features like payment processing or push notifications
Use Adalo's form components with validation rules to ensure only complete and accurate data is submitted to your database. This eliminates errors and keeps things running smoothly.
Take it a step further by designing a guided, step-by-step onboarding experience. For instance:
- Use visual actions to trigger navigation. When a client uploads their logo and submits the form, guide them to a confirmation screen.
- Add conditional logic to branch to the next step only after required fields are completed.
- Include progress indicators - like a bar or shapes - that update dynamically based on the client’s progress. Tie these to visibility conditions in your database so clients always know where they stand.
This kind of interactive flow makes the process intuitive, even for clients without technical expertise. Once all onboarding data is captured, you're ready to move to the next phase: automating app creation.
Automate App Cloning and Data Import
Now, standardize how you create and populate each client’s app. From your Adalo dashboard, use the "Duplicate" action to copy your core template app. Add a client-specific prefix (e.g., "ClientName-App") to keep everything organized. If you're managing multiple clients, consider a multi-tenant database setup. This allows you to use visibility filters to manage data access without needing separate app instances for each client.
For importing client data, rely on CSV uploads or external integrations. When a client submits their onboarding form, configure actions that automatically create database records and map form fields to the correct places. This keeps client data isolated using user-specific filters, ensuring privacy and security. Adalo’s paid plans offer unlimited database records, so scaling this process won’t add extra costs.
Once the app is ready, generate a Progressive Web App (PWA) or native app preview link and email it to the client. They can explore the branded app directly in their browser before you move forward with publishing native iOS and Android versions. To close the loop, include an approval screen with buttons like "Approve" and "Request Changes." These buttons can log client feedback directly into your database, creating a seamless feedback and approval process.
Step 5: Publish and Manage Branded Apps
Publish to App Stores
Once the client gives the green light, it’s time to publish the app. Head over to the Publishing section in Adalo, choose either iOS or Android, and fill in the client-specific details - like the Android Package Name (e.g., com.clientfitness.app) or the iOS Bundle ID. Upload the client’s branded assets, including their app icon, splash screen, and store screenshots. Set the version number, then generate the necessary build: an APK or AAB file for Android, or an IPA file for iOS.
Clients are required to use their own developer accounts to submit the builds. For Apple, this costs $99 per year, while Google Play charges a one-time fee of $25. This setup ensures the app is published under the client’s branding, maintaining the white-label structure. Before submitting, take advantage of Apple's TestFlight and Google Play's internal testing tracks to distribute beta versions and confirm that everything - especially dynamic branding - works smoothly on different devices.
Keep in mind that review times differ between platforms. Google Play reviews can take anywhere from 1 to 7 days, while Apple App Store reviews usually take 1 to 2 days, though delays of up to a week are possible. Thorough testing before submission can help avoid unnecessary back-and-forth with app store reviewers, speeding up the approval process.
Once the app is live, Adalo’s system makes it easy to manage updates and maintain client-specific branding.
Manage Updates Across Clients
Adalo’s single-codebase system simplifies updates for all client apps. When you update your core template - whether it’s fixing bugs, adding features, or improving performance - those changes automatically apply to all cloned apps. You only need to make updates once, test them in a staging environment, and then push them live. With Adalo's flat pricing model, you can publish unlimited updates to iOS, Android, and PWA without worrying about additional costs.
To maintain client-specific customizations, rely on database-driven dynamic components. For example, if a client needs a unique feature like appointment scheduling, you can use visibility filters tied to their client ID. This ensures the feature is exclusive to their app while keeping your core template clean and manageable. Before deploying updates, test them across a few client apps to verify that branding and custom features stay intact.
With manual publishing controls, you decide when changes in the builder go live. This gives you the flexibility to test thoroughly and roll out updates on your own schedule, ensuring everything runs smoothly for your clients.
Conclusion
Creating white-label SaaS apps for multiple clients no longer means juggling multiple codebases, sky-high costs, or lengthy development timelines. With Adalo's infrastructure, agencies can build once and deploy across web, iOS, and Android using a single scalable template. Tools like Magic Start and Magic Add speed up development, while the flat-rate pricing of $36/month ensures costs stay predictable.
What sets this approach apart is the operational efficiency it offers. Dynamic, database-driven branding allows you to customize each client's app without reworking core features. And with native app store publishing for iOS and Android, your apps are polished and ready for the market - no extra mobile development needed.
Since the release of Adalo 3.0, performance has taken a leap forward. Apps now run 3–4× faster, scale to over 1 million monthly active users, and process 20 million daily requests.
For agencies managing multiple client apps, the benefits are clear: one codebase means any update - whether it's fixing a bug or adding a feature - instantly applies to all client apps. It’s efficiency, simplified.
FAQs
Should I use one multi-tenant app or separate cloned apps per client?
When it comes to white-label SaaS solutions, a multi-tenant app is often the smarter choice. Why? It enables you to manage and customize services for multiple clients all within a single platform. On the other hand, creating separate cloned apps results in independent instances for each client. While that might sound appealing, it can quickly lead to higher complexity and increased costs. By opting for multi-tenancy, you can simplify operations, keep things scalable, and cut down on overhead expenses.
How do I keep each client’s data private in a multi-tenant Adalo app?
To keep each client’s data secure in a multi-tenant Adalo app, you’ll need to configure collection permissions carefully. By restricting access to sensitive data, you can ensure that only the right users see or modify specific information. Setting up user roles or permissions is key - this allows you to control who can view or edit particular data. This approach safeguards data privacy and ensures security across all clients.
What’s the best way to handle per-client branding without rebuilding screens?
Creating a single app template and customizing it for each client is a smart way to streamline app development. By tweaking elements like logos and color schemes, you can quickly produce multiple branded apps while working from the same codebase. This approach eliminates the need to rebuild screens from scratch, saving both time and effort.