How to Schedule Time-Based Actions in Adalo
Adalo, a no-code app builder for database-driven web apps and native iOS and Android apps published to the Apple App Store and Google Play, lets you automate app workflows based on dates and times, simplifying tasks like sending reminders or updating user statuses.
- Triggers and Actions: Triggers (e.g., button clicks) start workflows, while actions (e.g., notifications) define what happens next.
- Built-In vs. Custom Actions: Built-in triggers handle basics like navigation or database updates. Custom Actions (Professional Plan required) connect your app to external tools like Zapier or SendGrid.
- Setting Time-Based Triggers: Use conditional logic tied to Date/Time properties to automate workflows (e.g., send a notification if today's date matches a condition).
- Testing and Publishing: Test workflows in Adalo's preview mode and adjust conditions for reliability. Monitor live workflows through Adalo's database and analytics.
Adalo supports time-sensitive features across web, iOS, and Android, offering flexibility for apps like booking systems or reminder tools. Start with the free plan and scale as needed.
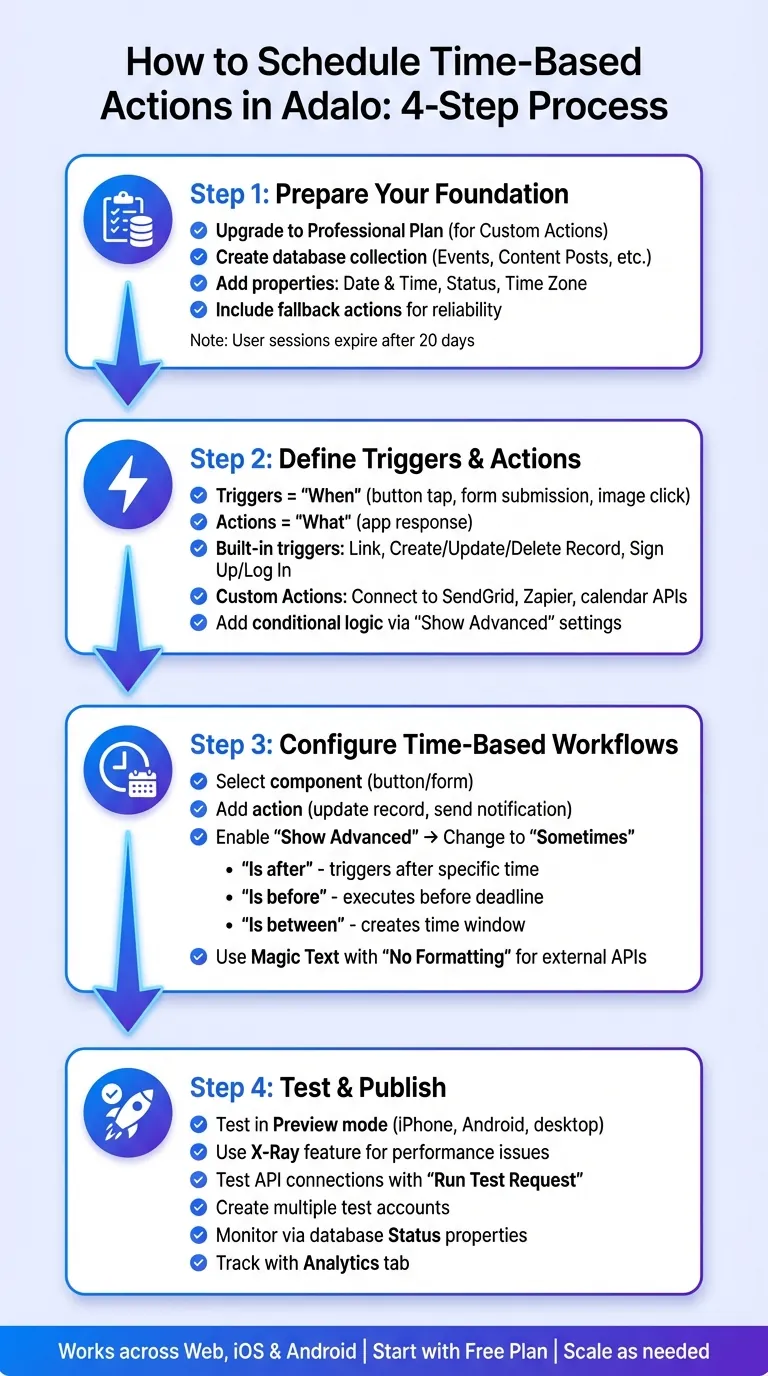
Step-by-step guide to scheduling time-based actions in Adalo
Scheduling Notifications in Adalo: Holiday Building Series - Part 3
What You Need Before Getting Started
Before diving into scheduled workflows, make sure your account and database are properly configured. You can test basic features on the free tier, but you'll need to upgrade to the Professional Plan to access Custom Actions—essential for working with external workflows and API connections. At $36/month, Adalo offers the lowest price for native app store publishing with unlimited usage, meaning no caps on actions, users, records, or storage.
Custom Actions apply at the team level, so any edits automatically update across all your apps. This is especially useful when integrating with external calendars like Google or Outlook.
Your database is the backbone of any scheduled action. To set up effective triggers, create a well-structured collection, such as "Events" or "Content Posts." Include properties like Date & Time, Status (e.g., Draft, Scheduled, Published), and, if needed, Time Zone. For apps requiring precise scheduling, add a Time Slots collection and a Buffer Time (measured in minutes) to avoid overlaps. If your app involves multiple users, link scheduled items to the Users collection for tailored actions.
Adding a Time Zone property ensures that scheduled content displays correctly in each user's local time. When using Magic Text for dates in external integrations, select the "No Formatting" option to ensure the data processes smoothly.
One thing to keep in mind: Adalo user login sessions expire after 20 days by default, which could impact notifications. To avoid issues, always include a fallback action in your conditional logic. This ensures your app stays functional even if time-based conditions aren't met. With this solid foundation, your app will be ready for reliable performance.
Next, you'll learn how to define triggers and actions to make your scheduled workflows work seamlessly.
How to Define Triggers and Actions in Adalo
Understanding Triggers and Actions
In Adalo, triggers are the "when" and actions are the "what" of your app's workflows. A trigger—like a button tap, form submission, or image click—kicks off an action, which tells your app how to respond. Actions create the interactive experience by connecting visual components to your database properties.
For more flexibility, you can add conditional logic to actions. Go to the "Show Advanced" settings and change "When does this happen?" from "Always" to "Sometimes." This allows you to set specific rules, such as sending a reminder email only if the event date "Is after" today or falls "Between" two dates.
The platform also uses Magic Text and Arguments to pass dynamic data—like user inputs or screen details—into your actions. This dynamic data handling is what makes time-based scheduling possible without writing code.
Using Built-In Triggers
Built-in triggers handle common app functions without needing external tools. These include Link actions for screen navigation, Create/Update/Delete Record for managing database entries, and Sign Up/Log In for user authentication. These triggers are available on all plans and work seamlessly with your app's internal collections.
For workflows based on time or conditions, you can pair built-in triggers with conditional logic. For example, you might update a record's status only if today's date meets a specific condition. Here's a tip: if you're using multiple conditional Link Actions on one component, always include a fallback non-conditional action. This ensures users won't get stuck without a destination if none of the conditions are met.
With no caps on database records or storage on paid plans, you can build complex scheduling systems without worrying about hitting limits. This removes the constraints that other platforms impose through usage-based pricing models.
Building Custom Actions
When built-in triggers aren't enough, Custom Actions let you connect your app to external services, opening up new possibilities. However, this feature is only available on the Professional Plan or higher.
Use Custom Actions to integrate with tools like SendGrid for email, Zapier for automation, or calendar APIs for scheduling. To create one, select a component, click "New Custom Action," and follow these steps:
- Name your Custom Action and choose an action type (Create, Update, or Delete).
- Enter the API Base URL and method (e.g., POST).
- Add any required authentication headers (like Authorization Bearer tokens).
- Define inputs for dynamic data, such as Text, Number, or Date/Time.
- Use Magic Text to build the JSON request body with your inputs.
- Test the connection to ensure everything works.
Keep in mind that Custom Actions are saved at the team level. If you edit one that's used in multiple apps, the changes will apply everywhere. To avoid disrupting other projects, create separate Custom Actions for each app. Lastly, when working with dates in API URLs, set Magic Text formatting to "No Formatting" so external services can interpret the data correctly.
How to Configure Time-Based Triggers and Workflows
Scheduling Actions Step-by-Step
To set up time-based actions, use conditional logic tied to Date/Time properties. Start by selecting the component—like a button or form—that will serve as the trigger. Add the action you want, such as updating a record or sending a notification. Then, click "Show Advanced" and change the "When does this happen?" setting from "Always" to "Sometimes".
From there, pick a Date/Time property in your database and choose a comparison type. You have three options:
- "Is after": Triggers the action once a specific time has passed.
- "Is before": Executes the action before a set deadline.
- "Is between": Creates a time window for the action to occur.
For tasks that need to repeat, you can integrate external automation tools through Custom Actions (available with the Professional Plan). When passing Date/Time data to these external services, set Magic Text formatting to "No Formatting" to ensure compatibility.
Ada, Adalo's AI builder, lets you describe what you want and generates your app. Magic Start creates complete app foundations from a description, while Magic Add adds features through natural language.
The AI Builder can accelerate this setup process significantly. With Magic Add, you can describe the scheduling feature you want—"add a reminder notification 24 hours before each appointment"—and the platform generates the necessary components and logic automatically. What used to require careful manual configuration now happens through natural language descriptions.
Connecting Time-Based Triggers with Other App Features
After scheduling your actions, you can enhance workflows by combining these triggers with built-in features. Use conditional date logic alongside Change Data actions to automatically update records or pair it with Trigger Notification actions to send alerts at specific times.
To ensure notifications work effectively, confirm that recipients have been active within the last 14 days and have granted notification permissions. Add a "Request Notification Permission" action early in your app flow to handle this. For native apps on iOS or Android, assign a "Target Screen" where users will land when they tap the notification.
You can also create calendar-based features by using a "Link to Website" action. Add a formatted URL with Date/Time parameters from your database, allowing users to add events to their calendars. For instance, include &reminder=30 to set a 30-minute advance reminder.
Since Adalo compiles to native iOS and Android apps from a single codebase, these time-based features work consistently across all platforms. You build once, and the scheduling logic functions identically whether users access your app on web, iPhone, or Android devices.
Tips for Optimizing Scheduled Workflows
When creating workflows with multiple time conditions, always include a fallback action that isn't conditional. This ensures users have a clear path forward if none of the conditions are met.
Keep in mind that users cannot receive notifications they've triggered themselves. Notifications are designed to alert other users or to be initiated by system-level events. Plan your notification logic accordingly—if a user schedules an appointment, the notification should go to the service provider, not back to the user who created it.
For apps with high scheduling volume, Adalo's modular infrastructure handles the load without performance degradation. The platform processes 20 million+ daily requests with 99%+ uptime, so your time-based workflows execute reliably even during peak usage periods.
Testing and Publishing Your Scheduled Actions
How to Test Scheduled Actions in Adalo
Before launching your app, use the Preview button to test scheduled workflows on iPhone, Android, and desktop views. This ensures that your conditional logic and time-based triggers work seamlessly across different devices.
For workflows that span longer durations, you can simulate shorter intervals. For example, to test a 30-minute timer, adjust the duration to 30–60 seconds using the formula (Current Time – Start Time) × 86400 minus 1800 seconds.
Leverage the X-Ray feature to pinpoint any performance issues before publishing. X-Ray uses AI to highlight potential scalability problems, helping you identify bottlenecks in your time-based workflows before they affect users. If your workflows interact with external APIs, such as calendar integrations, use the "Run Test Request" button in the Custom Action setup. This step helps confirm that JSON responses and data mapping are functioning as expected.
It's also a good idea to create multiple test accounts to cover a variety of user scenarios. For workflows involving notifications, test push notifications on native or PWA builds (since they're inactive in web preview). Ensure recipients meet the criteria—like being active in the last 14 days and granting notification permissions.
Once you've verified that everything works as intended, you're ready to publish your scheduled actions.
Publishing and Monitoring Your Actions
Publishing your app follows the standard deployment process. For web apps, set up your URL or custom subdomain through the Publish panel for an instant launch. For native apps, prepare the necessary assets and follow the app store submission guidelines—Adalo handles the complex App Store submission process, so you can focus on your app's features instead of wrestling with certificates, provisioning profiles, and store guidelines.
This streamlined publishing is a significant advantage. While competitors like Thunkable require their $189/month plan for app store publishing, Adalo includes this capability at $36/month—the lowest price point for native iOS and Android deployment with unlimited usage.
After going live, keep an eye on your scheduled actions by reviewing your database. Check properties like "Status" (e.g., Pending, Confirmed, Completed) or flags like "Reminder Sent" (True/False) to confirm that workflows are running as expected. For workflows managed by external tools like Zapier or Make, review their task history and logs to troubleshoot any issues.
The Analytics tab provides useful insights for monitoring performance. Track visitor activity, download stats, and user locations to evaluate how well your workflows perform in a live environment. These monitoring steps help ensure the reliability and effectiveness of your scheduled actions.
Comparing Scheduling Capabilities Across Platforms
When building apps with time-based functionality, the platform you choose significantly impacts both development speed and long-term costs. Here's how Adalo compares to alternatives for scheduling features:
| Platform | Monthly Cost | Native Mobile Apps | Usage Limits | Scheduling Complexity |
|---|---|---|---|---|
| Adalo | $36 | Yes (iOS + Android) | Unlimited | Visual conditional logic |
| Bubble | $69 | No (web only) | Workload Units (variable) | Requires backend workflows |
| Glide | $25 | No | Row limits | Limited to spreadsheet formulas |
| FlutterFlow | $80/seat | Yes | No database included | Requires external backend |
| Thunkable | $189 | Yes | Token limits | Block-based logic |
For scheduling apps specifically, Adalo's combination of native mobile deployment, unlimited database records, and visual conditional logic makes it the most cost-effective choice. Bubble's Workload Units can create unpredictable costs when time-based workflows trigger frequently, while Glide's spreadsheet foundation limits the complexity of scheduling logic you can implement.
FlutterFlow requires you to set up and pay for a separate backend service to store scheduling data, adding both cost and complexity. Thunkable's token-based pricing means high-volume scheduling apps can quickly exceed budget expectations.
Conclusion
Scheduling time-based actions becomes a seamless part of your app-building process with the right tools. Whether it's sending reminders, updating statuses, or triggering workflows, these features let your app handle tasks automatically—no manual effort required. By leveraging conditional logic alongside date and time properties, you can craft experiences that align with user schedules and business demands.
The single-codebase approach ensures these workflows function consistently across web, iOS, and Android. Time-sensitive operations run smoothly, backed by infrastructure that processes millions of daily requests with enterprise-grade reliability. For more advanced automation, Custom Actions provide the flexibility to extend your app's capabilities through external integrations.
Start testing your scheduling features on the Free Plan, and as your app evolves, upgrade to access additional tools. To ensure everything runs as intended, use buffer times to avoid overlapping events and test thoroughly across various time zones for a seamless experience for all users.
Related Blog Posts
- How To Create The Digital Calendar App You Need for iPhone and iOS
- How To Create a Gift Remembering And Prompting App
- How To Create a Content Scheduling App
- How to Create any Appointment App
FAQ
Why choose Adalo over other app building solutions?
Adalo is an AI-powered app builder that creates true native iOS and Android apps. Unlike web wrappers, it compiles to native code and publishes directly to both the Apple App Store and Google Play Store from a single codebase. At $36/month with unlimited usage, it offers the lowest price for native app store publishing with predictable costs—no hidden charges or usage-based fees.
What's the fastest way to build and publish an app to the App Store?
Adalo's drag-and-drop interface and AI-assisted building let you go from idea to published app in days rather than months. Magic Start generates complete app foundations from text descriptions, while Magic Add lets you add features by describing what you want. Adalo handles the complex App Store submission process, so you can focus on your app's features instead of certificates and provisioning profiles.
How long does it take to build a scheduling app?
With Adalo's AI Builder, you can create a functional scheduling app in hours rather than weeks. Magic Start generates your database structure, screens, and user flows from a simple description. Adding time-based triggers and notifications typically takes an additional few hours of configuration and testing.
Do I need coding experience to set up time-based actions?
No coding experience is required. Adalo uses visual conditional logic—you select Date/Time properties from dropdown menus and choose comparison types like "Is after" or "Is between." The platform handles all the underlying code automatically.
How much does it cost to build a scheduling app?
Adalo's Professional Plan costs $36/month and includes everything you need: native iOS and Android apps, App Store publishing, Custom Actions for external integrations, and unlimited database records. Unlike competitors with usage-based pricing, your costs stay predictable regardless of how many scheduled actions your app processes.
Can I publish my scheduling app to the App Store?
Yes. Adalo compiles your app to native iOS and Android code and handles the App Store submission process. Your scheduling features, notifications, and time-based workflows all function natively on users' devices—not through a web wrapper.
What features should a scheduling app have?
Essential features include Date/Time properties for triggers, Status fields to track workflow states (Draft, Scheduled, Published), push notifications for reminders, and Time Zone support for users in different locations. For booking apps, add Time Slots and Buffer Time properties to prevent scheduling conflicts.
What do I need to use Custom Actions for external integrations?
Custom Actions require the Professional Plan ($36/month) and allow you to connect your app to external services like Zapier, SendGrid, or calendar APIs. They're saved at the team level, so edits apply across all your apps—consider creating separate Custom Actions for different projects to avoid unintended changes.
How do push notifications work with scheduled actions?
Push notifications can be triggered by time-based conditions, but recipients must have been active within the last 14 days and granted notification permissions. Add a "Request Notification Permission" action early in your app flow. Note that users cannot receive notifications they've triggered themselves—notifications are designed for alerting other users.
Which is more affordable for scheduling apps, Adalo or Bubble?
Adalo is significantly more affordable at $36/month versus Bubble's $69/month. More importantly, Adalo offers unlimited usage while Bubble charges Workload Units that can create unpredictable costs when time-based workflows trigger frequently. For scheduling apps with high action volume, Adalo's flat pricing provides better cost predictability.